WordPress Contact Form
The number of WordPress Contact Form plugins is overwhelming. How to choose one out of the 3.312+ available WordPress contact form plugins? And why use them anyway?
Why use a WordPress Contact Form?
Adding a Contact Form to a WordPress website can help:
A website owner to:
- become more visible
- gain potential customers
- get customer feedback
A web visitor to:
- contact the company easily
- and in a safe manner - no public e-mail exposure or spam risk
- 24/7 hr availability: whenever it best suits them
How to create an e-mail contact form in WordPress
You can create an E-mail Contact Form for your WordPress website in several ways. Selecting the "best contact form plugin" varies based on your company needs. These three plugins below can help you create an e-mail contact form in WordPress based on your needs.
TIP: Put the e-mail contact form in the Contact Page to make it traceable.
- Beginner: Contact Form 7
- Customize: Supsystic Contact Form
- User-friendly: WPForms Contact Form
Beginner: Contact Form 7
First, Contact Form 7 is the most downloaded contact form plugin. Used by millions of people worldwide. If you’re a beginner searching for a free online contact form, this is a good start. Yet not the best solution.

With this free plugin, you can manage many contact forms. It supports o.a. CAPTCHA (robot protector), and antispam control (Akismet spam filtering).
And free add-on Third-party plugins are available.
Yet, it is a basic content form. The user interface is not very intuitive or customizable. Finding a suitable add-on is difficult and comes with limited support.
Install Contact Form 7:
- Install Contact Form 7.
- Upload the ‘contact-form-7’ folder to: /wp-content/plugins/ directory.
- Choose ‘Plugins’ in the WordPress Dashboard to activate the plugin.
- In the WordPress admin panel, you will now find ‘Contact’.

Create a Contact Form 7:
- Click ‘Contact’.
- To create a form, click ‘Add New’. Choose a form.
- Click ‘Elements’ in the top sheet or ‘edit the code’.
- Click ‘E-mail ’ to add sender and receiver e-mail addresses.
- Fill in the ‘E-mail Subject’ with "[your-subject]" code.
This will automatically add the selected value of the sender. - Review the ‘Messages ’ text overview.
The website user will receive this text message. - Click "Expand the form" if you want to add your own source code.
- TIP: Read the WordPress shortcode tutorial.
- Click "Save" to save the created e-mail contact form.
- Go back to "Form Overview" to see the e-mail contact list.
- Copy and paste the shortcode into your WordPress page.
- TIP: Install the Contact Form DB plugin to save the messages from your e-mail contact form in a database (transparent table). In this way, you can store website insights for future use.
Customize: Supsystic Contact Form
Second, Supsystic is a simple, yet free, customizable e-mail contact form builder. It offers a drag-and-drop editor. To make changes in the design, you do not need coding knowledge.
Install Supsystic:
- Install Supsystic.
- Upload the ‘Supsystic’ folder to: /wp-content/plugins/ directory.
- Choose ‘Plugins’ in the WordPress Dashboard to activate the plugin.
- In the WordPress admin panel, you will now find ‘Contact Form by Supsystic’.
Create a Supsystic E-mail Contact Form:
- Click ‘Contact Form by Supsystic’.
- To create a form, click ‘Add New’.
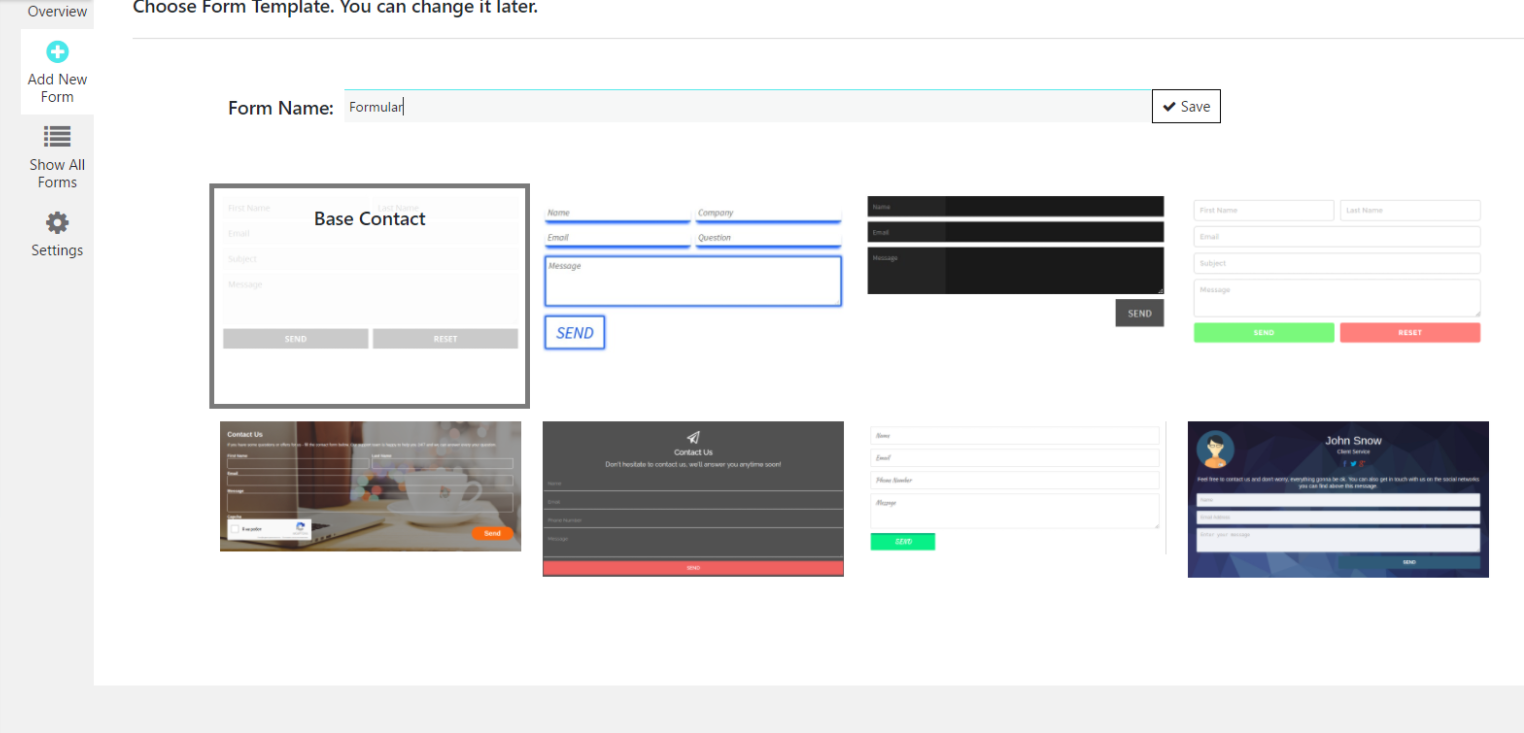
- Choose a name and click ‘Appearance’.
- Select a ‘design template’.
Below, you will see an instant preview of the form with the applied look. - Choose ‘Fields’ to select "individual fields, text, and location.
- The movement of the elements takes place in the "Catch and Go" style.
- Click ‘E-mail ’ to add sender and receiver e-mail addresses.
- Fill in the ‘E-mail Subject’ with "[your-subject]" code.
This will add the selected value of the sender. - Review the ‘Messages ’ text overview.
The website user will receive this text message. - Click "Save Contacts" to save the sent message.
User-friendly: WPForms Contact Form
Third, WPForms is a powerful WordPress contact form plugin. This is a user-friendly, drag & drop online form builder. It lets you create professional e-mail contact forms without technical knowledge. Available both as Free and Paid (premium version).

The free version, "WPForms Lite", allows you to install it on as many sites as you like. With the premium version, you can extend the functionality and build multi-page forms, such as e-mail subscription forms, payment forms or order forms.
Install WPForms Lite
- Install WPForms Lite.
- Upload the ‘WPForms Lite’ folder to: /wp-content/plugins/ directory.
- Choose ‘Plugins‘ to activate the plugin WPForms Lite.
- In the WordPress admin panel, you will now find ‘WPForms’.
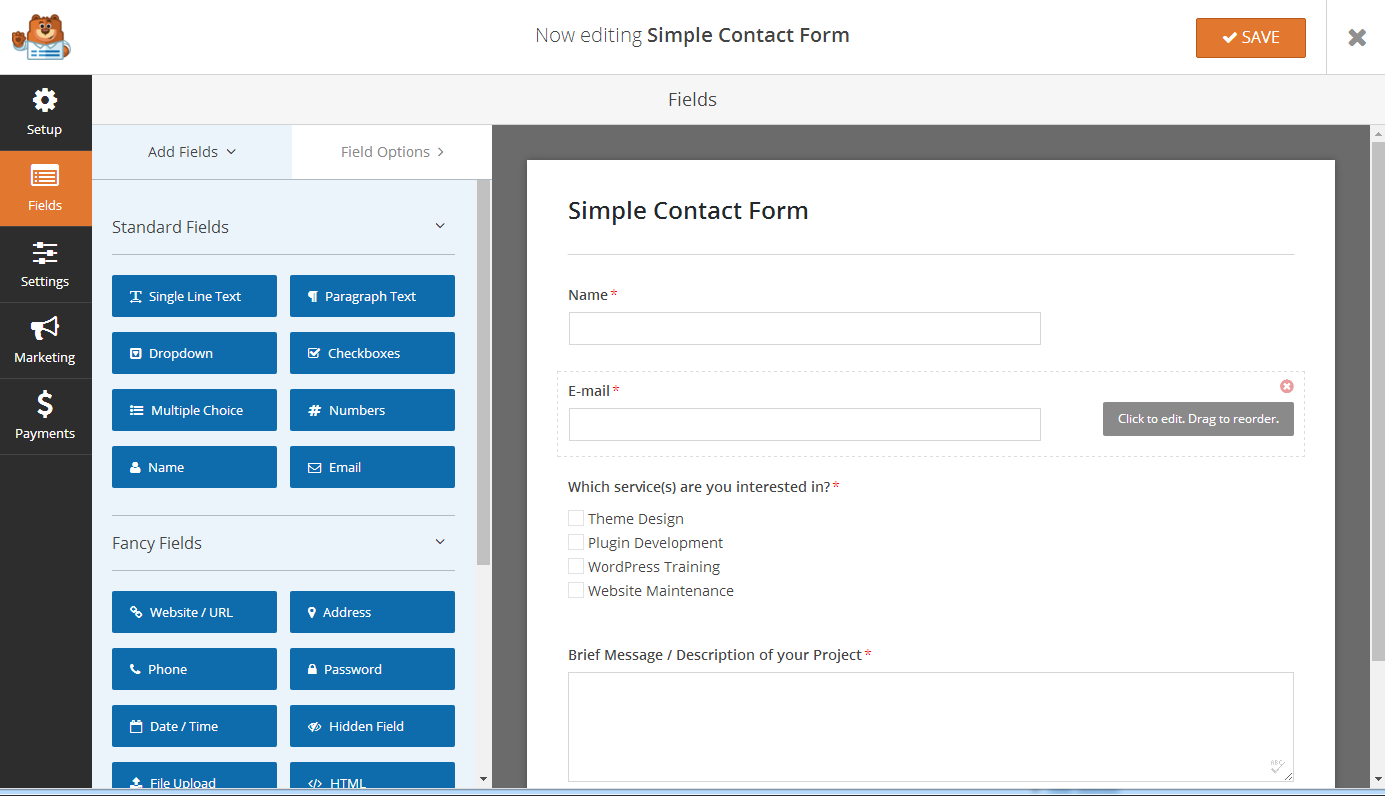
Create a WPForms Lite E-mail Contact Form:
Click the “Add New” button to create your new WordPress contact form.
For more information: Watch this video.